Integrate Jira
eHour's Jira integration lets your team log time on Jira issues without leaving Jira. A time tracking panel is added to the Activity tab on each issue where users can log hours, use a stopwatch, and manage their entries.
All time is stored in eHour, not in Jira's native worklog. This means your time data stays in eHour where it feeds into timesheets, reports, and budgets, while Jira remains your project management tool. Jira's built-in work log items are not used.
Before installing, please note that this app registers eHour as the default time tracking provider for your Jira instance. This means Jira’s native work log time tracking will be hidden and replaced by eHour system-wide.
While you can choose which specific Jira projects display the eHour interface, native work logs will not be available on any project.
Switching to eHour does not delete any existing Jira worklogs. If you switch back to Jira's built-in time tracking, your old Jira worklogs will reappear. However, time logged through eHour is stored exclusively in eHour and will not appear in Jira's native worklog view.
Overview
Setting up the integration involves four steps:
- Connect eHour to Jira: authorize eHour to access your Jira Cloud instance via OAuth
- Select Cloud Instance: selecting the Jira instance
- Link projects: select which Jira projects map to eHour projects
- Connect Jira with eHour: install the eHour time tracking app in Jira and connect it back to eHour
Step 1: Connect eHour to Jira

- In eHour, go to Admin > Integrations > Jira
- Click Connect Atlassian Jira
- You'll be redirected to Atlassian's login page. Sign in with an Atlassian account that has admin access to the Jira site you want to connect.
- Atlassian will ask you to grant eHour permissions to operate. An explanation of why we need each permission is at the bottom of this article.
- Click Accept to authorize
- You'll be redirected back to eHour
Step 2: Selecting your Jira Cloud instance
After authorization, eHour shows a list of Jira Cloud instances your Atlassian account has access to. Select the instance you want to connect and click Next.
Step 3: Link projects
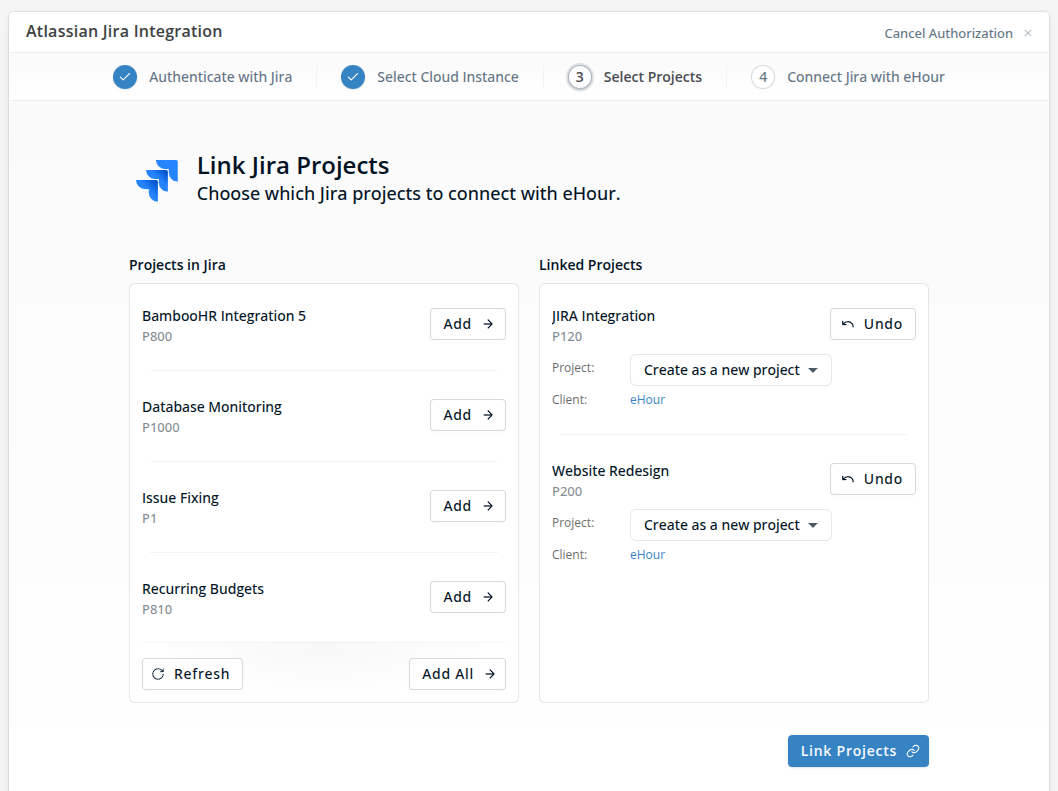
After connecting to Jira, you'll see the project linking screen. This is where you choose which Jira projects should have time tracking powered by eHour.
The screen shows two columns:
- Left: Available Jira projects (from the connected Jira instance)
- Right: Linked projects (Jira projects already connected to eHour projects)
For each Jira project you want to link, you have two options:
- Link to an existing eHour project - choose an existing project from your eHour project list
- Create a new eHour project - eHour creates a new project automatically and links it to the Jira project
Once done, click Link Projects. eHour will:
- Start syncing issues from linked Jira projects into eHour as tasks
- Keep issues in sync automatically going forward
You can come back to this screen at any time to link or unlink projects.
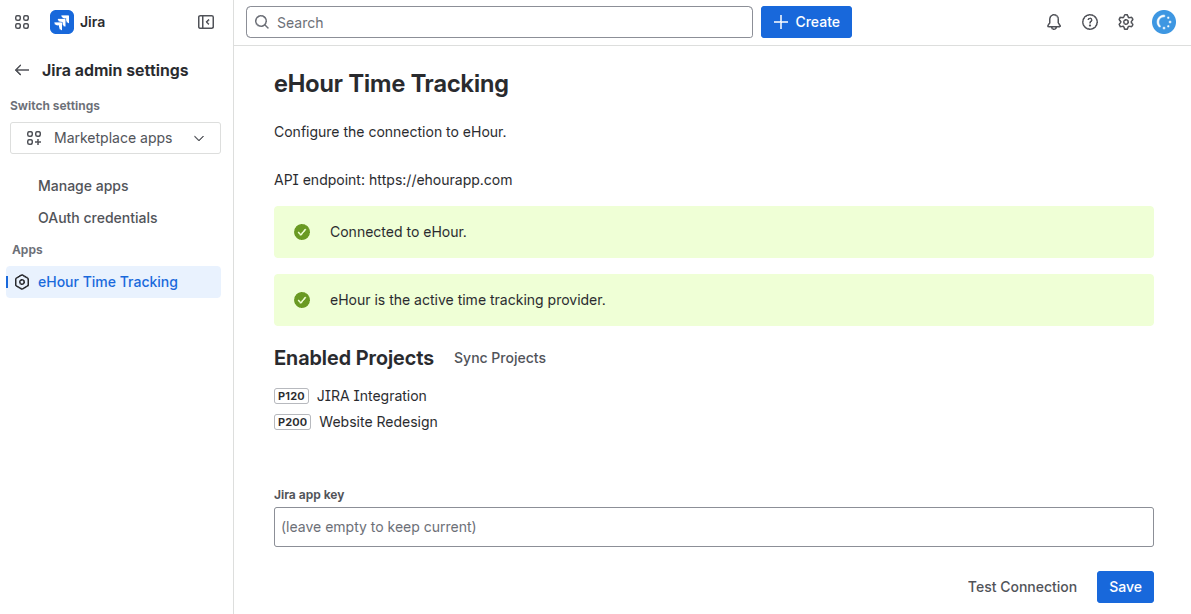
Step 4: Connect Jira with eHour
eHour can now talk with Jira, but Jira cannot talk yet with eHour.
First we need to create the Jira app key to allow the Jira app to communicate with your eHour instance.
- Click Generate API Key
- Copy the key now, as it won't be shown again. You will need it in the next step.
- Install the eHour Time Tracking app in Jira, available from the Atlassian marketplace.
- In Jira, go to Settings > Marketplace Apps > eHour Time Tracking
- Paste the Jira app key and click Test Connection.
- When it's says Connected to eHour, click Save.
- eHour will be set as the active time tracking provider, and projects that were linked earlier are synced with eHour
Track time from Jira
With the integration active in both directions, users now see an “eHour Time Tracking” tab on each ithe selected projects. From there they can start a timer, log time manually, and view all time already tracked for that issue.

Time logged in Jira is recorded in eHour, so the same entry automatically appears in the user’s timesheet.

Reconnecting after token expiry
OAuth tokens can expire over time. If this happens, eHour shows a Reconnect Jira banner on the integration page. Click it to re-authorize. Your project links and API key remain intact.
Disconnecting Jira
- In eHour, go to Admin > Integrations > Jira
- Click Disconnect
- You'll be asked whether to also delete the eHour projects that were created for the integration
- Confirm to disconnect
Disconnecting removes the OAuth connection and webhooks. The Forge app in Jira will no longer be able to communicate with eHour. Time entries that were already logged are preserved in eHour.
Permissions
Atlassian will ask you to grant eHour the following permissions and this is what we use them for:
| Permission | Read/write | Why |
| jira-project | Read/write | We read the project names from Jira and set a property on the linked projects. This tells the Jira app which projects have time tracking enabled and where the eHour panel should appear in the project’s issues. |
| jira-webhook | Read/write | We create webhooks to receive real-time notifications when Jira issues are created, updated, or deleted, keeping tasks in sync. We can only manage the webhooks that were created by our app. |
| jira-user | Read | We read user profiles to match Jira users to eHour users by email address. |
| jira-work | Read | We read issues from linked projects to create matching tasks. |